
Configuring a process
Index
1 How to add a process to a category
3 How to create new transitions
4 Changing the colour of states
5 Configuring automatic actions on the process
How to add a process to a category
From the "Process" step you can define the process to be followed by the documents that belong to the category. By default, categories do not have an assigned process.
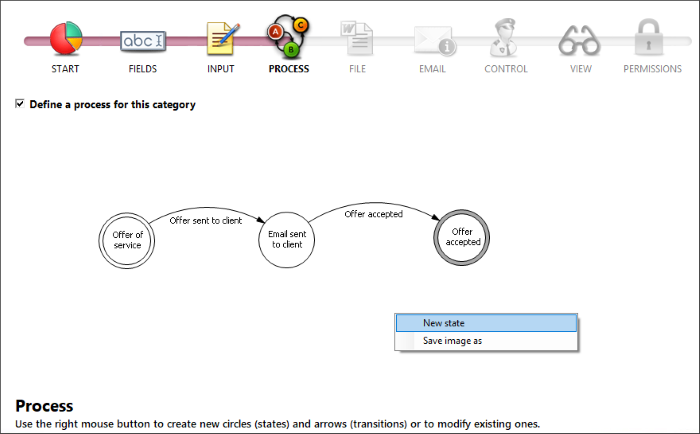
To establish a process you need to check the "Define a process for this category" box.
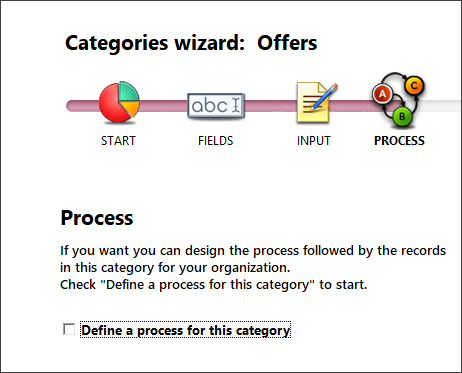
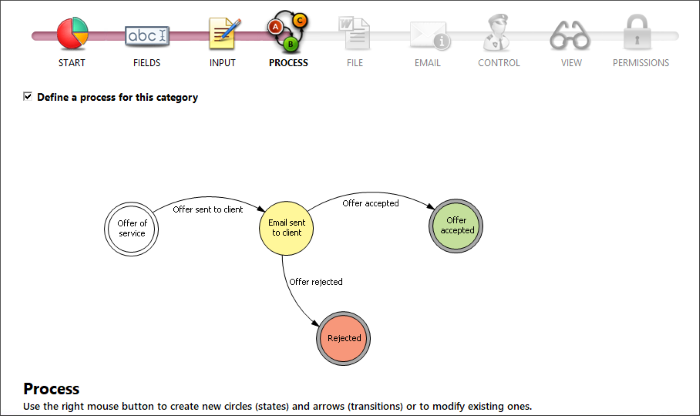
Checking the box enables a standard process consisting of three states. This is a model process so that you can view the appearance of a process and define start and end states. You can delete these states or create additional states. This process is provided only as an example.
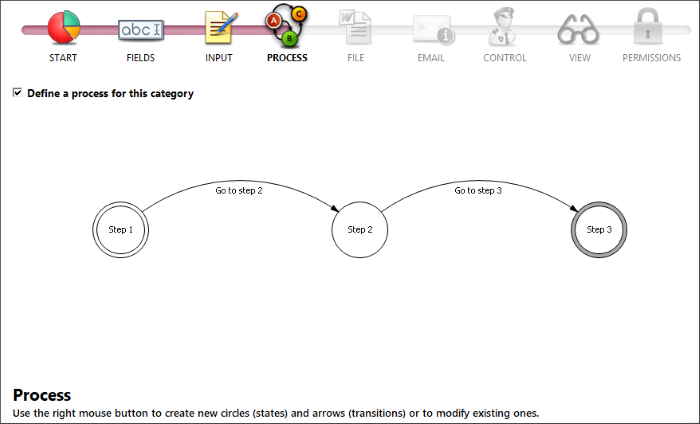
To change the name of the states double-click on the state to be changed, and this will open up a text box where you can enter the new name of the state of the process.
The example will simulate creating a process for the Offers category:
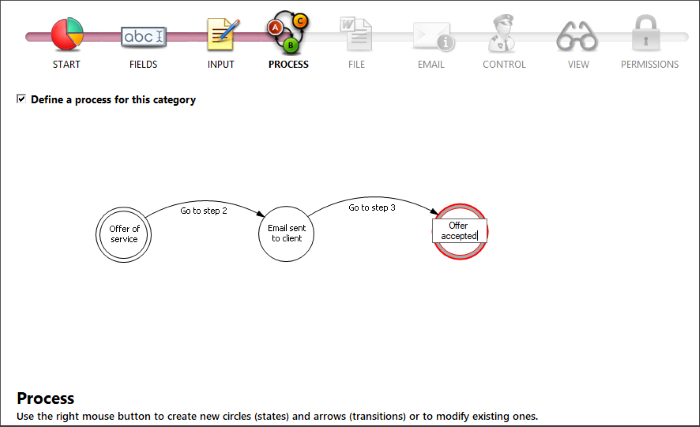
To change the name of transitions double-click on the middle of the transition and enter the name.
You can click and drag on any state to place it elsewhere on the map.
How to create new states
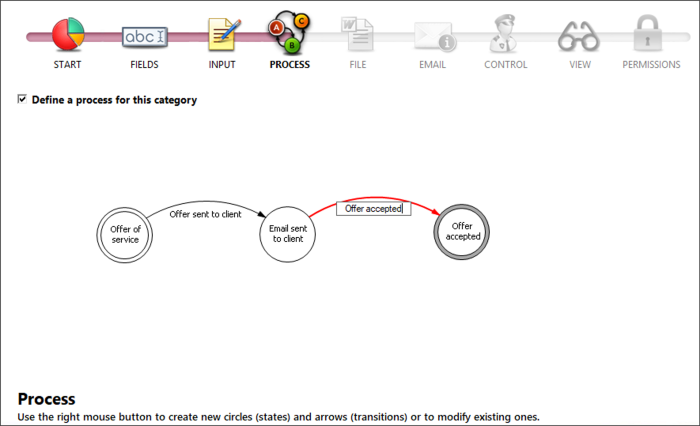
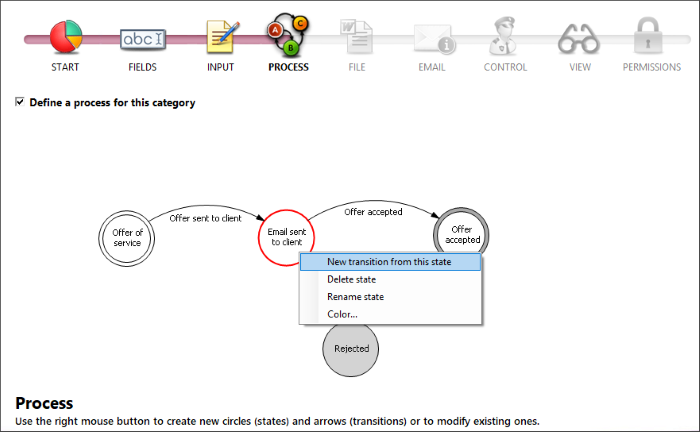
Continuing with the example in the Offers category, it is also possible that the client will reject the offer. To add this case you need to create a new state by opening the process options with a right click of the mouse in the white area.
This will create an isolated state in a gray background where you can enter the name of the state in the text box and press Return.

How to create new transitions
Once you have created the new state you need to establish from which state you can reach the "Rejected" state. Open the state options with a right click of the mouse on the state of origin and select "New transition from this state".
Enter the name of the transition and hit Return. To join the transition to the state you will need to drag the tip of the arrow from the transition to the middle of the state. The process now includes the newly created state and offers can now be sent to client, accepted or rejected.
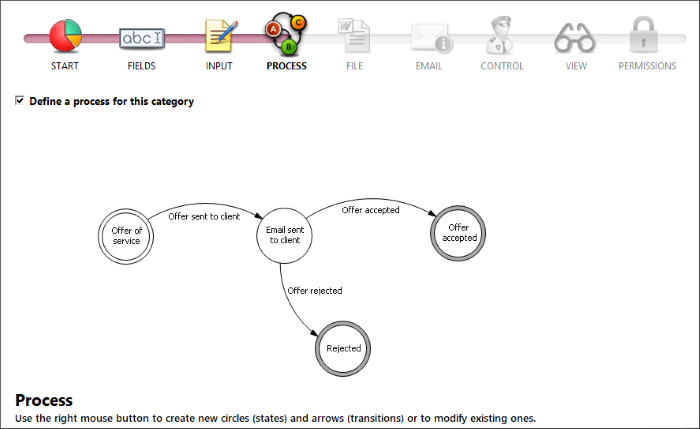
You can also create a transition to return to a previous state. For example, if the client requests changes to the offer, you can create a transition from "Email sent to client" to "Offer of Service".
Changing the colour of states
R2 Docuo allows you to define colours for states so that when a document is in that state it will appear in the defined colour.
To establish colours for states you will need to open the state options by right clicking the mouse and selecting "Colour".
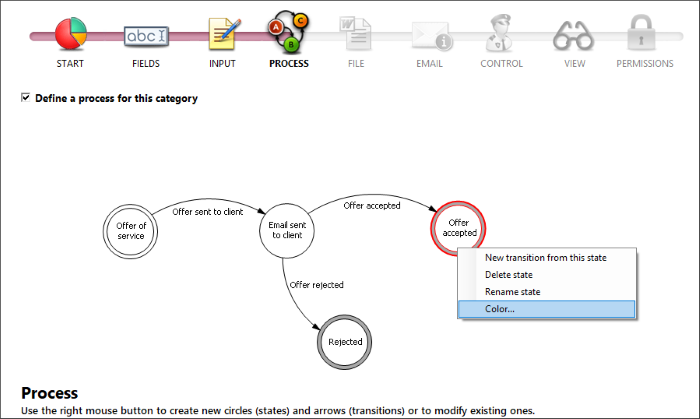
You can select the required colour from the colour palette and save changes. The state will appear in the process in the selected colour.
Configuring automatic actions on the process
The processes allow, in addition to controlling the status of documents, configure automatic advances, establish automatic actions on the document when advancing status, have it ask the date on which a document was advanced and also set up new automatic messages and the ability to move documents in related categories
To set the different configuration options for the transitions, open the transitions menu with the right mouse button and select "Configure".
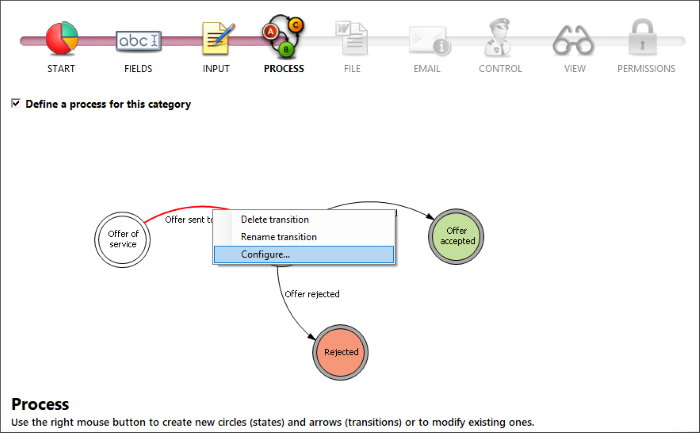
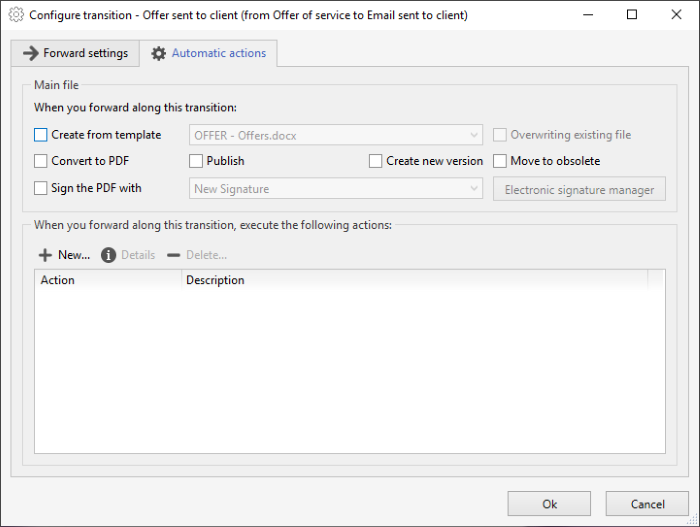
All possible configuration options for transitions appear in the configuration window. You can combine several options at once across two tabs just select the desired action of each group. The first tab covers how the document is moved forward.
The second tab covers all the action that take place when the document is moved forward again you can select multiple options here.
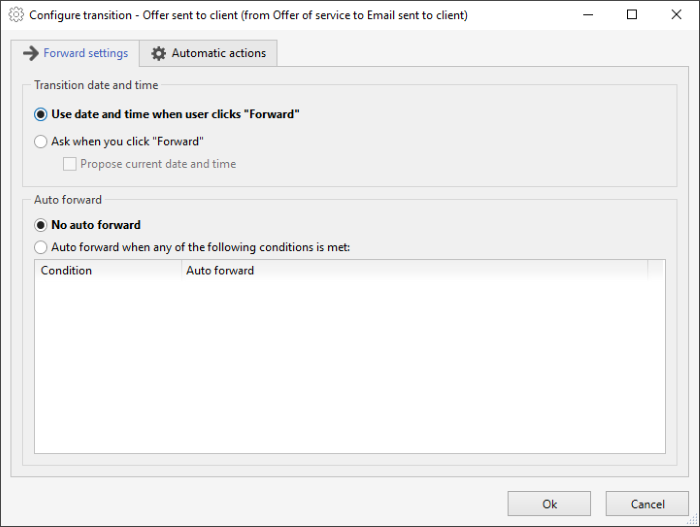
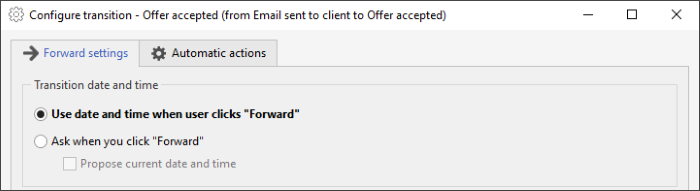
Forward settings
Date and time of the transition
This group of options allows you to define whether the date and time in which the action is executed is used when advancing the status or the date is asked to the user.
This action is very useful for users who do not advance documents at the same time that the change occurs. For example, in the case of offers, you can set to ask the date on which the offer was accepted, so if the user in charge of advancing the document has not been able to do so on the same day, he can put the actual acceptance date .
By checking "Ask when you click "Forward"", the option "Propose current date and time" is enabled.
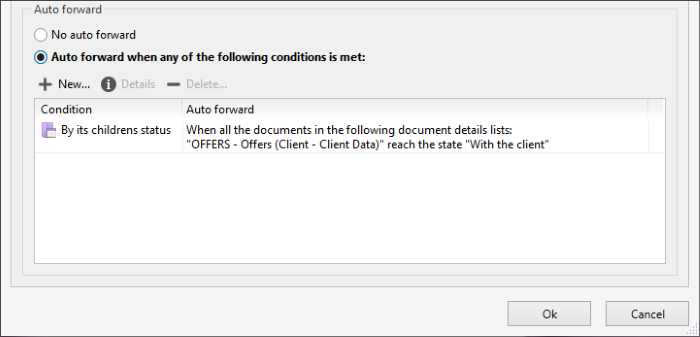
Auto forward with conditions
The group of automatic advancement options allows to establish conditions for documents of a certain category to advance automatically when the assigned conditions are met.
To add conditions you have to check the "Auto forward ....." and press the new button.
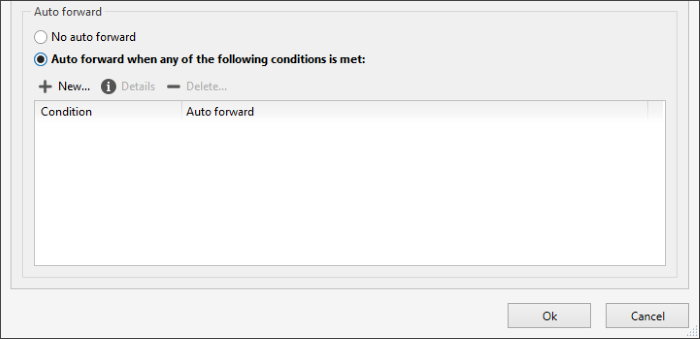
You can set conditions based on a date or depending on the status of your children.
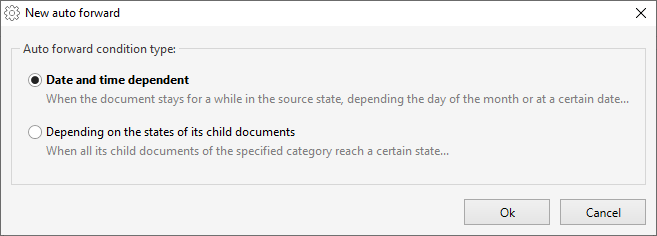
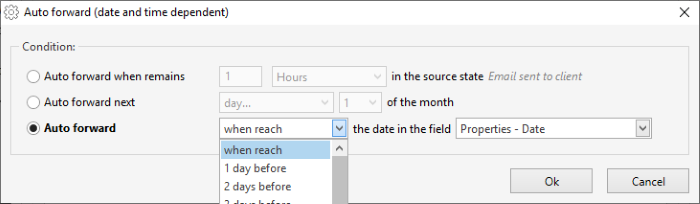
Automatic time and date conditions
It can be established that the document advances automatically when it takes x hours, days, weeks or months in the source state.
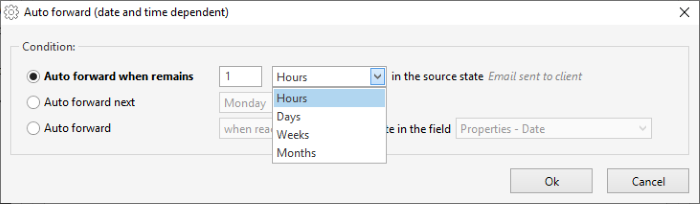
Another configuration option is to set a day of the week or a specific day or the month in which the documents will automatically advance through the selected transition.

The last option for configuring automatic advances is to select x days before or after the date indicated in a field.
Advance dependent on the status of their children
When the category is related to another you can configure automatic advances depending on the status of your children.
When selecting the option, a sale is opened to select the related category and the state to which they must arrive in order to generate the automatic advance through the transition.
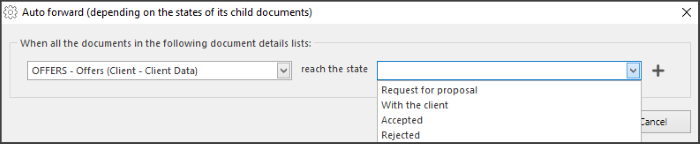
In the example we have selected that the offers advance to the status "With the client" when the orders related to the offer reach the "Sent" status
Automatic publishing
Automatic options are only available when the category has assigned templates or version control.
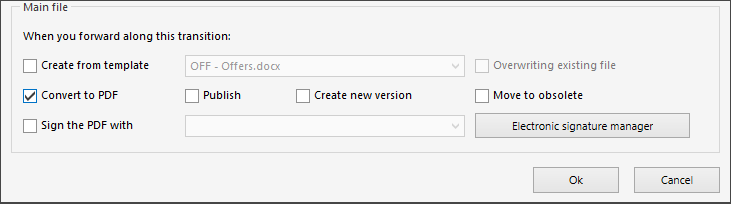
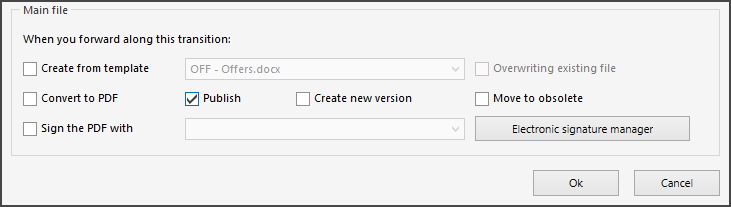
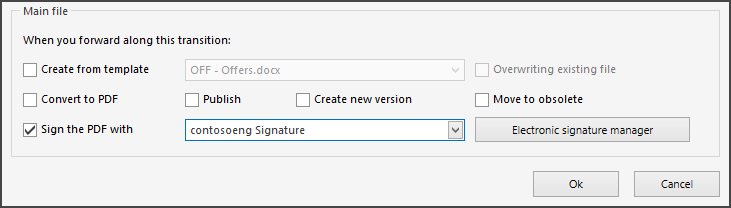
The selected actions are carried out when advancing the status without asking the user for confirmation. It is possible to combine several actions so that for example when advancing the status the document is generated from template and published leaving it ready to send.
The create from template action causes the document to be generated with the template that is selected in the drop-down when the status is advanced.
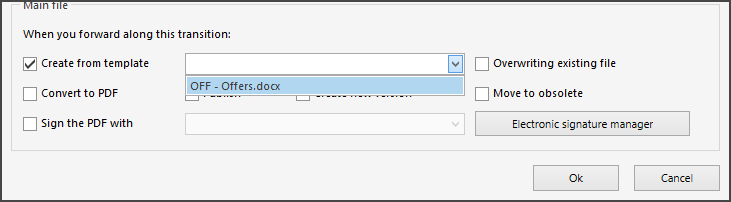
Convert to PDF only applies when the main document is a Microsoft Office file, when advancing from state it converts the main file to PDF.
The automatic publishing action publishes the draft as the status moves through the transition.
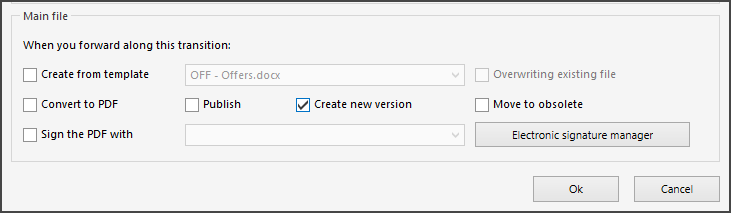
Creating a new version means that when the status is advanced, a draft with a copy of the published version will be generated. The draft version number will be consecutive to the published version.
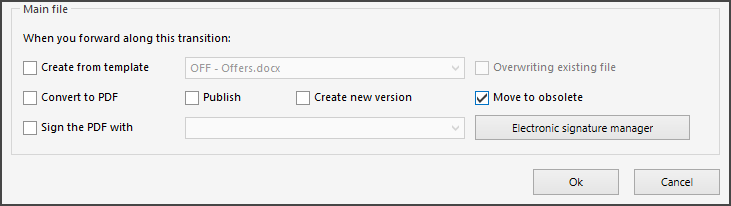
Going to Obsolete makes the published version disappear and be added to the version history when the status is advanced.
Signing the PDF is only available if the repository has an assigned electronic signature. For more information on how to assign electronic signatures to R2 Document click here.
Additional automatic actions
You can add another type of automatic actions when moving forward, such as automating the creation of file-type fields, creating emails or configuring progress depending on the status of the related documents.
To create these actions you have to press the "New" button and select the corresponding action.
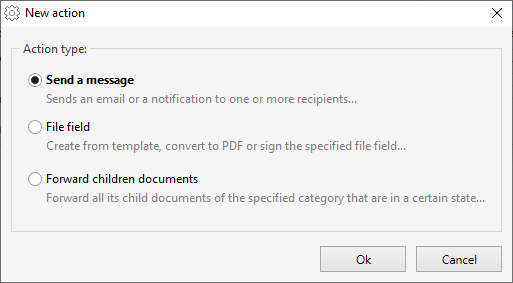
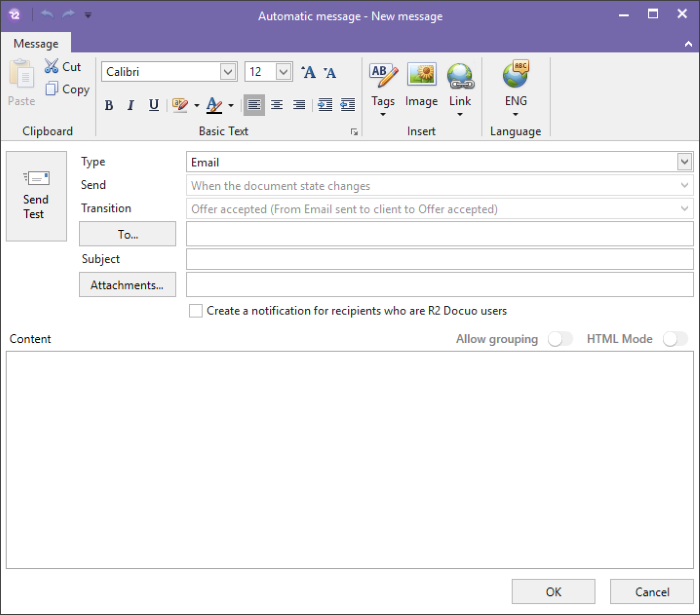
Sending a message when you change a state.
Selecting "Send a message" will open the automatic email editor to create a new email or notification to be send when you forward along this transition. You can see more details on the creation of automatic emails here. The only difference here is that you save by pressing "OK"
Automatic actions on file-type fields
When the category has file-type fields when configuring the transitions, you can select a new action then select "File field" to open the configuration options.
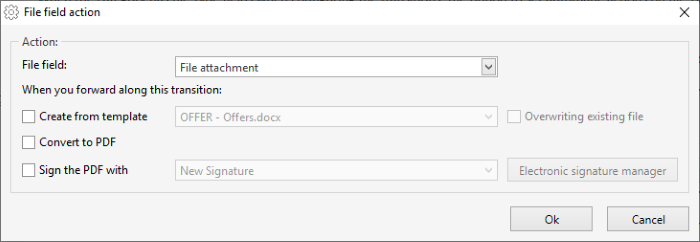
If the category has more than one file field you can choose the field you wish to create the action for.
In the window of the configuration options, the actions to be performed when advancing the state are defined by selecting the check of each action.
Advance "Child" documents when you change a state
If the category has related documents, you can configure the transition so that, when you advance through it, a document advances your children to a specific state.
When selecting the option and accepting, a window is opened to define the related category on which the progress is going to be configured, the state in which the documents are to be advanced and the transition through which they would advance.
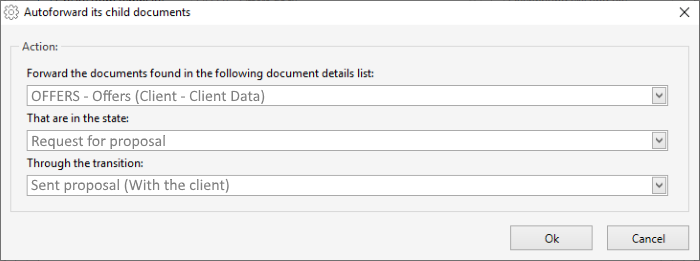
In the example we have configured that when advancing of an offer all the documents of the category "Offers" associated to the offer advance from the state "Request for proposal" to the status "With the client".

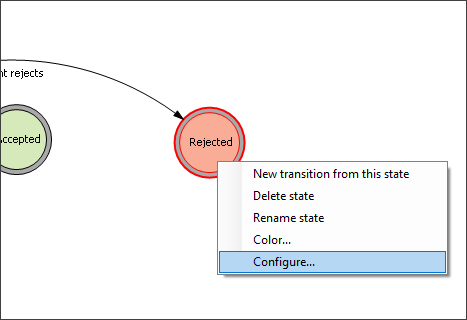
Configuring actions on the final state(s)
Each final state that you have in a process can be configured with more additional options. To access these options right click on any final state and select "Configure..."
You will then be introduced to a new window.
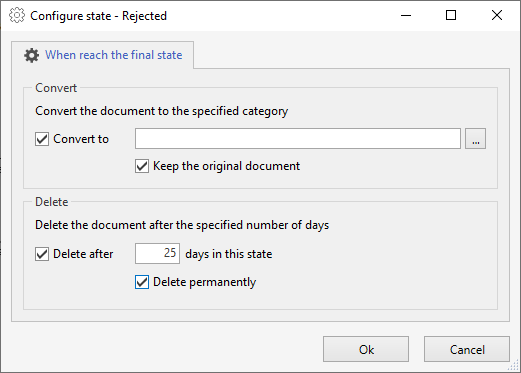
Here you have two new main options with an additional option to follow.
1. You can select that when a document reaches this state that it will be converted to another category that you can select using the "..." button.
1.1 You can select the tick box to keep the original document in this category else it will be removed once converted.
2. You can select that when a document reaches this state that it will be deleted and sent to the trash after how ever many days that you request.
2.1 You can select the tick box to have it deleted permanently instead of remaining in the trash.
When converting a document to another category, if the new category does not have shared fields from the original category or all metadata will be lost. For more information on shared fields click here.
When documents are deleted permanently they can not be retrieved.
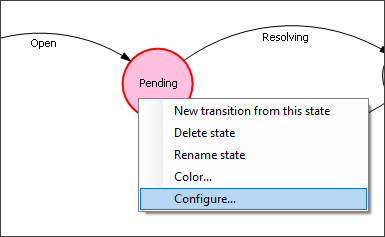
Configuring actions on any state
Any state in your process can have additional actions performed. To open these options right click on the desired state and select "Configure..."
You will be introduced to the "Automatic actions" window of that state.
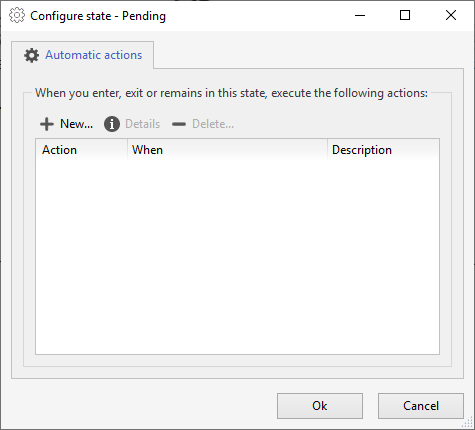
This window allows you create new actions, see previously created actions and modify those actions. To create a new action click "New..."
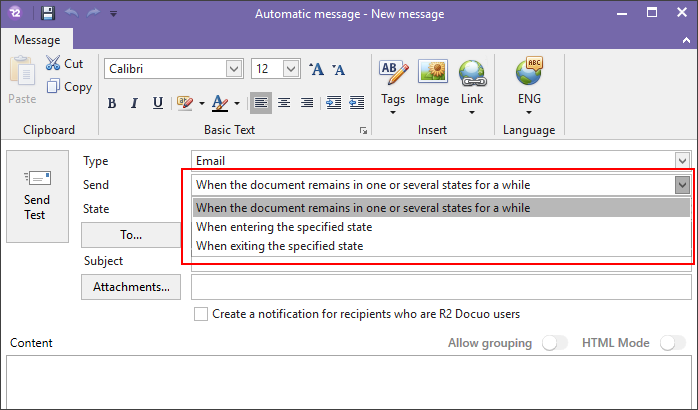
It will open up the "Automatic message" editor where you can create custom emails for three specific actions in this particular state.
they are:
1. When the document remains in one or several states for a while.
2. When entering the specified state. (Can not create in an initial state)
3. When exiting the specified state. (Can not create on a final state)
Any message you create here will then be shown in the previous window and also in the email step of the category manager where it can also be edited there and others can also be created there. For more information on automatic emails click here.